You should now be looking at the R:BASE window with the Database Explorer displayed. To confirm, you will see the main R:BASE caption read the "R:BASE 11", then your database name listed in square brackets, then "R:BASE Database Explorer" listed in square brackets.
•If you do not see your database listed in brackets, then connect to it now by selecting "Database" > "Connect to Database..." from the main menu bar. You will be prompted to locate your database files where they are stored on your computer. Once connected to your database, you will see the database name listed in the R:BASE 11 program caption, in brackets.
•If you do not see "R:BASE Database Explorer" listed in square brackets, then select the "Database Explorer" button on the main Tool Bar. It is the first button on the left and the hint displayed will read "Database Explorer".
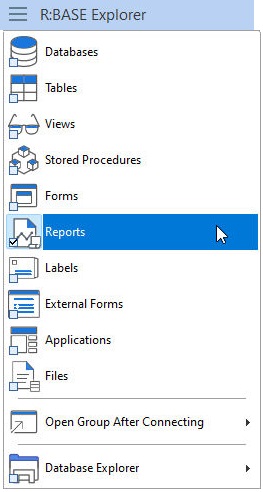
At the Database Explorer window, you will see the "Navigator" listed on the left side of the window containing various menu options of R:BASE database modules (e.g. Tables, Views, Forms, etc.)
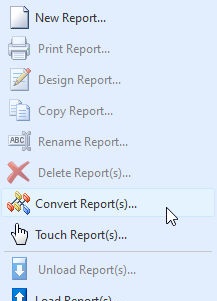
| 1. | Click on the Database Explorer button and choose "Reports" from the drop down menu (figure 1), then select the "Convert Report(s)..." menu option (figure 2). |
(figure 1) |
(figure 2) |
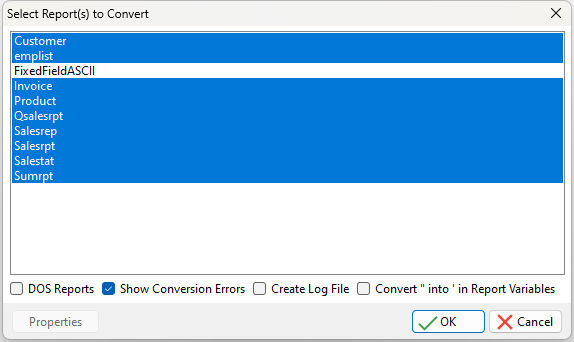
Upon selecting this option, a dialog will appear that may contain a list of the available reports to convert (figure 3). The reports listed are Windows-based reports that were created in a previous Windows version of R:BASE.
(figure 3)
| 2. | Individual reports can be selected and converted. Multiple reports can be converted by holding the [Ctrl] key and selecting individual report names. Or pressing the [Ctrl]+[A] keys will select all listed reports. Press the "OK" button to convert the selected reports. Conversion options include the ability to show errors, create a log file, and convert " into ' for report variables as check boxes. As the earlier steps advised to change the QUOTES setting from double quotes to an apostrophe, the last option will make legacy migrations much easier. |
The report(s) will convert and will be displayed in the Database Explorer.
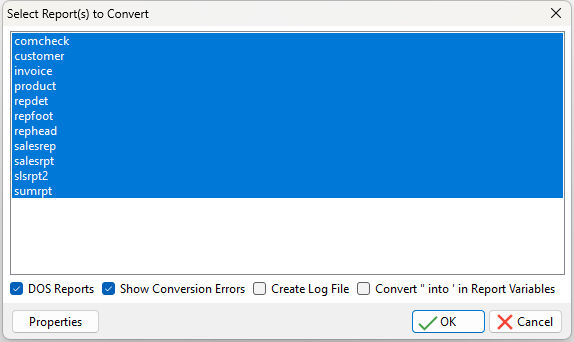
| 3. | The database may contain DOS reports. Select the "DOS Reports" check box. The dialog may now contain a list of the available DOS reports to convert (figure 4). Any reports listed are DOS-based reports that were created in a DOS version of R:BASE. |
(figure 4)
| 4. | The "Properties" button provides a form conversion option to change single and double line characters to blank spaces, alter the Font (name, color, size, and style), Form Border (style and width), Form Background Color, Text (transparent), and Edit Objects (text color and background) (figure 5). |
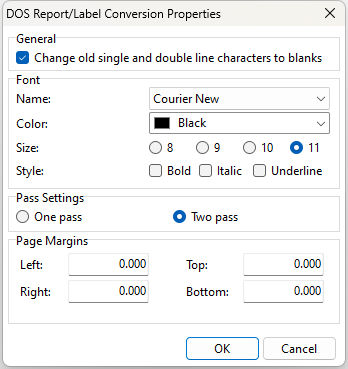
(figure 5)
Maintaining single and double lines in the conversion process may help see how a report was divided into sections. The pass setting processes system variables once or twice are the report is generated. For DOS reports, the default is one pass. For Windows reports, the default pass setting is two. Margins in DOS reports begin at zero. The margin can be changed for any custom reports.
| 5. | Like with the Windows-based reports, the DOS reports can be individually selected and converted. Multiple reports can be converted by holding the [Ctrl] key and selecting individual report names. Or pressing the [Ctrl]+[A] keys will select all listed reports. Press the "OK" button to convert the selected reports. |
The report(s) will convert and will be displayed within the Database Explorer.
At this point, you can now enter the Report Designer to view and make changes to the reports. There are Issues and Suggestions to review for the converted reports. However, since many of the instructions below refer to specific control/object names and require a basic understanding of the Report Designer, it is recommended that you perform the conversions of the remaining modules (e.g. forms, labels), and then complete the R:BASE Tutorial before continuing.
From the Main Menu, choose "Help" > "R:BASE Tutorial". This tutorial covers step-by-step instructions on building a complete database and application from scratch providing the R:BASE relational logic as it adhere's to Dr. Codd's relational model. This is where one would learn how to quickly adapt to the R:BASE interface!