When using an Inner Join, rows are returned when there is at least one row in both tables that match the join condition. Inner Joins are the most common join operation and is the default for R:BASE joins.
The following instructions will step through the process to recreate an Inner Join in the Query Builder.
To continue, launch R:BASE 11 and connect to the RRBYW20 sample database. The database is located in the following default installation directory: "C:\RBTI\RBG11\Samples\RRBYW20".
1.Start R:BASE
2.Connect to the RRBYW20 sample database, by selecting "Database" > "Connect", and navigating to the above default installation directory based upon your version.
3.Then, launch the Query Builder by selecting "Tools" > "Query by Example" from the main menu bar
In the Query Builder you will see a list of tables and views within a panel to the left that can be added to your query. The list contains all tables and views for the connected database.

4.Add the "Titles" table to the query by selecting the table, and then selecting the "Add Table/View" button.
The table should now be listed under "Tables/Views In Use".
5.Right click on the "Titles" table under "Tables/Views In Use", and choose "Join Properties..." from the speed menu.
The "Join Properties" dialog will be displayed.
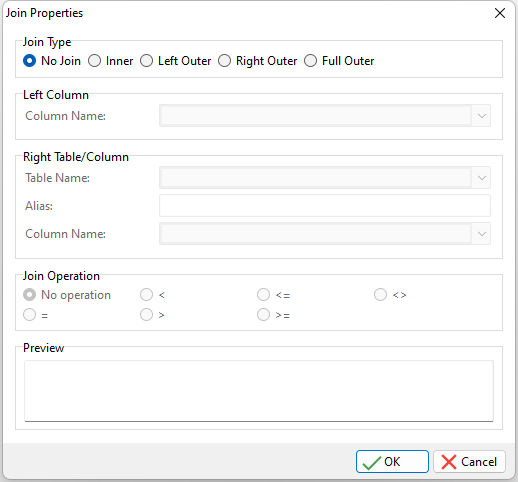
6.From the "Join Type" radio button options, select "Inner"
Take note that the other options within the window will become enabled. In this window you will select the linking columns for the join, the second table for the join, and the join operation. As alias can also be assigned to the linking column.
7.From the "Left Column" panel, choose "T1.EmpTID" from the "Column Name:" drop down box. The "T1" alias may vary from your R:BASE screen.
8.From the "Right Table/Column" panel, choose "Employee" from the "Table Name:" drop down box.
9.From the "Right Table/Column" panel, enter "T2" into the "Alias:" field to assign the table alias for the join. If "T2" is already used for the "Titles" table, then use "T3" as the alias.
10.Again in the "Right Table/Column" panel, choose the "EmpTID" column from the "Column Name:" drop down box. The alias you have assigned will appear in from of the column name.
11.From the "Join Operation" radio button options, choose the equal character (=).
Your end result for the Join Properties should look like, or close to, the following:

12.Select the "OK" button.
In the Query Builder main window, you should see the SQL syntax displayed in the bottom of the page as:
SELECT *
FROM Titles T1 INNER JOIN Employee t2 ON T1.EmpTID = t2.EmpTID
13.Then, browse the query results by selecting "Query" > "Browse Query" from the main menu bar. The results should look like the following:
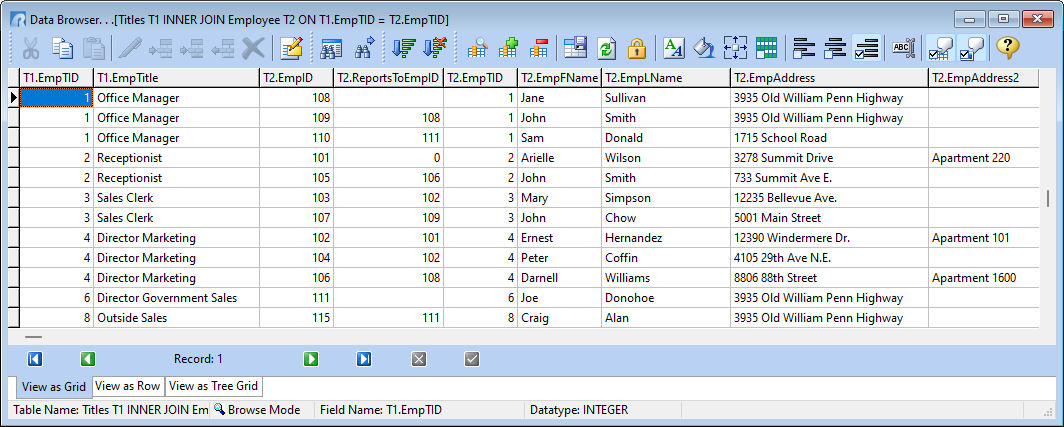
The results show the "Employee" table added to the "Titles" table. Each employee is displayed next to the title where the "EmpID" column matches.
14.Close the Data Browser window.
Next, the number of columns displayed will be decreased.
15.Right click on the "Titles" table under "Tables/Views In Use", and choose "Select Columns..." from the speed menu.
A dialog will be displayed with the available columns for each of the tables.
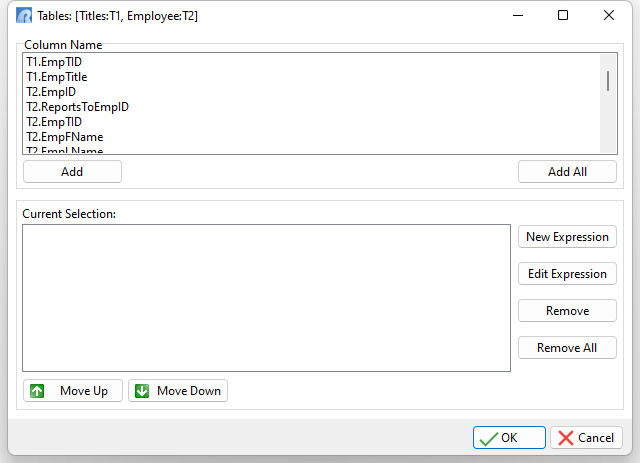
Once the "Tables" dialog is displayed, you can add the columns one at a time by selecting the desired column and pressing the "Add" button, or double click on a desired column. All columns can be added at once by pressing the "Add All" button.
16.Select the "EmpTitle" column, and select the "Add" button.

When a column is added, an optional column alias can be assigned in the "Column Alias" dialog, that appears each time a column is added to the query/view.
17.Press the "OK" or "Cancel" buttons to allow R:BASE to assign the alias for you.
18.Also add the "EmpFName" and "EmpLName" columns individually and do not enter an alias for each.
19.Press the "OK" button to save the columns added.
In the Query Builder main window, you should see the SQL syntax displayed in the bottom of the page as:
SELECT T1.EmpTitle,T2.EmpFName,T2.EmpLName
FROM Titles T1 INNER JOIN Employee T2 ON T1.EmpTID = T2.EmpTID
20.Now, browse the query results by selecting "Query" > "Browse Query" from the main menu bar. The results should look like the following:
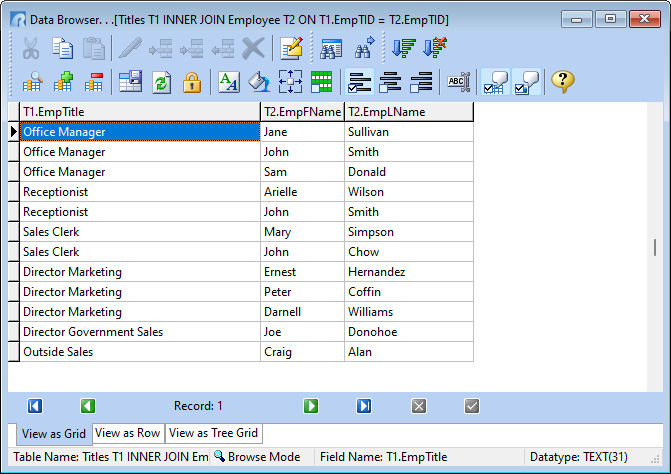
The results show the "Employee" table added to the "Titles" table and only the title first name and last name columns are displayed.Each employee is displayed next to the title where the "EmpID" column matches.
If you wish to save the query, follow the below steps.
1.From the main menu bar, select "File" > "Save Query As View..."
2.In the dialog, enter "TitleEmp" within the "View Name:" field.
3.In the dialog, enter "Title and Employee List" within the "View Comment:" field.
4.Select the "OK" button.
5.Close the Query Builder by selecting "File" > "Close" from the menu bar.
In the Database Explorer, the view will be displayed with the name, comment, and number of columns.