When you are working with relational data, you often need to view information from more than one table or view on the same report. For example, you want to see customer data, but you also want to see information about the customer's orders at the same time. A Sub Report is a useful tool for doing this because it allows you to display the order information on the report with the customer information, in a logical and readable method.
A Sub Report is a report that is inserted in another report. A report containing Sub Report objects must have an additional table or view added to the report for each defined Sub Report. Each Sub Report must be associated with a slave table/view. Slave tables/views may be added by selecting "Tables" > "Add/Remove Tables" from the Report Designer menu bar.
When creating Sub Report reports, a relationship is used between the tables in which each report is based upon. One report must serve as the main report that contains the other report. The relationships between the tables may one-to-many or many-to-many, which may contain common column or primary key/foreign key linking values. As an example, the main report would be based on a table with a primary key, and the Sub Report is based on a table with a foreign key. Custom table relationships are also available for multi-table reports to set custom column links between tables. Select "Tables" > "Add/Remove Tables" within the Report Designer, to alter the table relationships. The default table relationship in reports is common field/column names.
After adding a Sub Report object to a report, it must be associated with a slave table/view. Use the Edit Toolbar to assign a table to the selected Sub Report.

When a Sub Report is placed, an additional tab will be displayed at the bottom of the workspace, with "Main" and "Sub Report" associated with appropriate tables. Each additional Sub Report will have its own tab associated with corresponding table. For the main report, and each Sub Report, there is a separate workspace to add labels and report objects. You can access the workspace areas for any given report by selecting the displayed tab.

Sub Report Print Behaviors
The Sub Report control provides three different print behaviors, which are available when right-clicking upon a Sub Report object:
1.Child - the width of the Sub Report control is used as the page width, and the page height of the parent report is used as the height. The report begins printing at the first available location on the page and then "stretches" across as many pages as are necessary to complete the report. Sub Reports set to Child behave like stretching memo fields and are well suited for most "multiple detail band" requirements. Because Child Sub Reports use the width of the Sub Report control as the page width, they are also useful for some side-by-side reporting effects. Child is the default print behavior.
Note:
•When using Child Sub Reports, set the parent band to Dynamic Height, to display more data on each page.
2.Fixed - the dimensions of the Sub Report control are used as the page size of the report. The report generates a single page fitted to these dimensions. This setting is most often used when a report of fixed size, such as a table, needs to be printed at a pre-defined location on the page.
3.Section - the Sub Report uses its own Printer Setup property to determine the page dimensions. When the report completes printing, the last page is completed and control is returned to the parent report at the beginning of the next page. When several independent reports need to be "chained" together, Section Sub Reports are generally the best choice.
Section type Sub Reports also have the capacity to change the printer settings for the portion of the report in which they generate. Use the Sub Report's Printer Setup property to specify the different settings, just as you would a normal report. If you specify a different printer in Printer Setup than that of the parent report, then a New Print Job will be started on that printer when the report generates. This means that different sections of a report can not only use different printer settings, but that they can also be sent to different printers.
Notes:
•In order to link several reports together, place each subsequent Sub Report in the Report Footer band of the preceding report.
•In order to keep Section type Sub Reports from taking up any space in the parent report, place the Sub Report in a band by itself and set the band's property to Dynamic Height.
Example Sub Report
In the following example screen shot, the main report is based upon the Customer table. The Sub Report is based upon the Contact table.
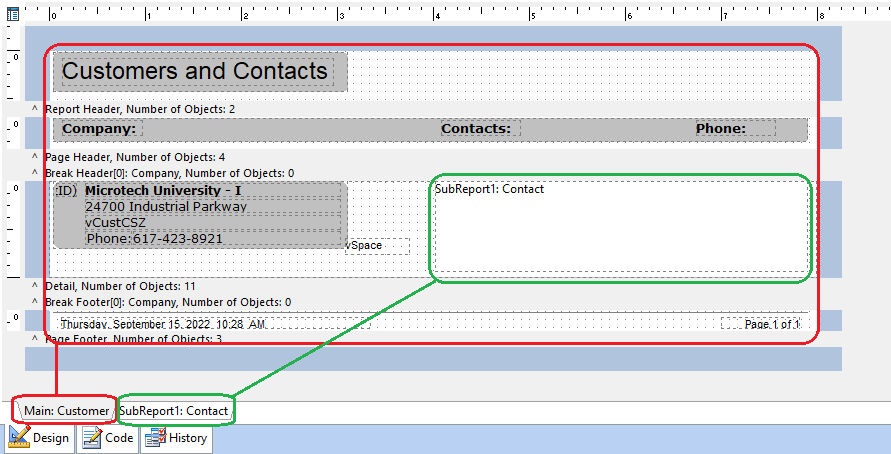
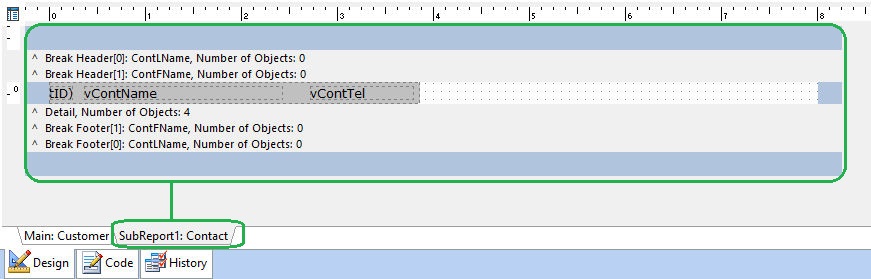
When the "SubReport1: Contact" tab is selected, the Sub Report is available to work on the report, within the report.
Properties for Sub Report Objects
To set additional properties for Sub Report objects, right click upon a Sub Report control. The pop-up menu includes the following options:
•Align - displays the Alignment dialog for adjusting the horizontal and vertical alignment of the selected objects
•Size - displays the Size dialog to alter the width and height of objects
•Component ID - specifies a unique identifier used when passing PROPERTY/GETPROPERTY parameters in statements calling the report
•Bring to Front - places the currently selected object on the foreground of layered objects
•Send to Back - places the currently selected object in the background of layered objects
•Child - A single page "Print Behavior" that prints the Sub Report based on the dimensions and position of the Sub Report object
•Fixed - The "Print Behavior" in which the report prints to completion, using the Sub Report components width as the page width and stretching over several pages until printing is complete
•Section - The "Print Behavior" in which the report prints as a separate section, starting a new page when it begins and finishing the last page when it ends. The printer settings are used to determine the page size and printer settings
•Keep Together - specifies the pagination of the Sub Report when the contents cannot fit on the current page. Normally the contents are printed to the bottom of the available page space and then continued on subsequent pages until complete. If Keep Together is checked, the Sub Report will advance to the next page when the contents do not fit.
•New Print Job - When the "Print Behavior" is set to "Section", this property determines whether a new print job is started when the Sub Report is sent to the printer. This property can be used when a portion of a report needs to be printed to a separate printer. If you need to change printer settings for a certain section, you can do so without starting a new print job. Simply set the value of the appropriate printer settings (Orientation, Paper Name, Bin Name, etc.) and these settings will be applied as the report prints.
•Parent Printer Setup - When the "Print Behavior" is set to "Section", this property specifies whether the values for the printer settings use the parent report’s Printer Setup. If "Parent Printer Setup" option is False, then one or more of the printer settings differ from the parent report.
•Parent Width - When checked, this property forces the width of the component to match the width of the parent component. The parent may be either a band or a region.
•Position - opens the Position dialog window for specifying hard-coded coordinates
•Reprint On Overflow - Reprint On Overflow applies to situations where a Stretchable component is stretching across pages. If the object overflows onto a new page, any components that are on the same band will reprint on the new page (if Reprint On Overflow is checked).
•Reset Page No - When the "Print Behavior" is set to "Section", this property enables subset page numbering. In subset page numbers, the page numbers and page count of the Sub Report are displayed instead of the master report page numbers.
•Shift Relative to... - When multiple stretching components occupy the same band, use this property to specify how each component should be positioned relative to other stretching components. Shift Relative To can only be used for components that are dynamically sized. If you have a static component, such as a label, which needs to shift relative to a given stretching component, then place the component in a region and set the Region's Shift Relative To to the stretching component.
•Shift With Parent - Shift With Parent applies to situations where a Stretchable component is stretching. If Shift With Parent is checked, the report component will move based on the amount of stretching the text requires. When you want components to appear at the bottom of a memo, this is a useful feature. If the memo stretches to a new page, the components will print on the next page.
•Stretch - Determines whether the height of the object automatically stretches to allow the entire contents to be printed
•Traverse All Data - applies to Sub Reports that have the "Print Behavior" set to "Fixed". When set to True, this property indicates that the Sub Report will continue to print (print on additional pages in the same exact position) until all data is traversed. By default the fixed type Sub Report truncates the data (e.g. prints once per band, but does not overflow if all data can't fit in the space of the Sub Report).
•Visible - The Visible property determines whether a report component will be printed
•Help - Launches the Help file chapter for the specific control
Note: When stretching components are placed within a region, the Shift Relative To property is disabled. You may notice that all of the stretching components in the band do not always appear in the Shift Relative To dialog when you are assigning this property. This is due to validation logic which ensures that components which are shifting relative to one another are not involved in a circular reference. In other words, if Memo1 is shifting relative to Memo2, then Memo2 cannot shift relative to Memo1, as this would create a situation which the report engine could not resolve.
Sample Reports:
Please refer to the CustContInvoices and CustomerContacts reports included within the RRBYW20 sample database, to review the use of Sub Reports.