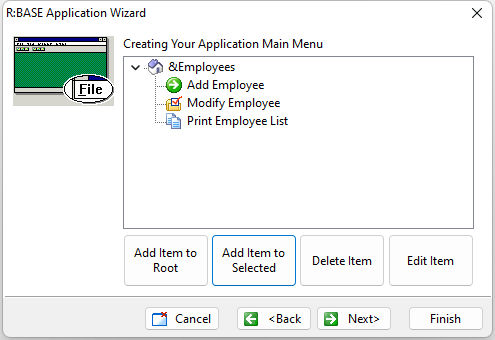
The Employees menu will have actions for adding, modifying, and printing employee information.
To define the Employees Main Menu:
| 1. | In the R:BASE Application Wizard "Creating Your Application Main Menu" window, select the "Add Item to Root" button. |
The "Menu Item Editor" dialog appears.
| 2. | Enter "&Employees" in the "Menu Item Caption:" field. |
The ampersand (&) is placed in front of the letter to create an accelerator character. When the application is run, the accelerator character for "Employees" is the letter "E". Based on your computer's operating system, the accelerator character letter appears underlined. When you choose the [Alt] key plus the underlined letter, the drop-down menu opens down. For example, [Alt]+[E] will open the "Employees" drop-down menu.
| 3. | Add an image to the menu, then click the OK button. If no images were added earlier, skip this step. |
"&Employees" now appears in the window.
| 4. | Highlight "&Employees" and select the "Add Item to Selected" button. |
The "Menu Item Editor" dialog appears. This time, we will use the "Action List" panel.
| 5. | Select "Add Employee" from the list of actions, which is the first menu action to appear in the "Employee" drop-down menu. |
| 6. | Click the OK button. |
| 7. | Highlight "&Employees" and select the "Add Item to Selected" button. |
| 8. | Select "Modify Employee" from the list of actions, which is the second menu action to appear in the "Employee" drop-down menu |
| 9. | Click the OK button. |
You can see now how a tree structure will be displayed for your application menus.
| 10. | Highlight "&Employees" and select the "Add Item to Selected" button. |
| 11. | Select "Print Employee List", the third drop-down menu action. |
| 12. | Click the OK button. |
The drop-down menu for the menu "Employees" is complete.

Defining the Customers Menu
The "Customers" menu will have options for adding, changing, and printing customer information.
To define the Customers Menu:
| 1. | In the R:BASE Application Wizard "Creating Your Application Main Menu" window, select the "Add Item to Root" button. |
The "Menu Item Editor" dialog appears.
| 2. | Enter "&Customers" in the "Menu Item Caption:" field. |
| 3. | Add an image to the menu, then click the OK button. |
"&Customers" now appears in the window within its own branch.
| 4. | Highlight "&Customers" and select the "Add Item to Selected" button. |
The "Menu Item Editor" dialog appears. This time, we will use the list of actions on the left panel.
| 5. | Select "Add Customer" from the list of actions, which is the first menu action to appear in the "Customer" drop-down menu. |
| 6. | Click the OK button. |
| 7. | Highlight "&Customer" and select the "Add Item to Selected" button. |
| 8. | Select "Modify Customer" from the list of actions, which is the second menu action to appear in the "Customer" drop-down menu |
| 9. | Click the OK button. |
Now, will display a sub-menu to provide two ways to print customer labels.
| 10. | Highlight "&Customers" and select the "Add Item to Selected" button. |
| 11. | Enter "Print Customer Labels" in the "Menu Item Caption:" field. |
| 12. | Add an image to the menu, then click the OK button. |
| 13. | Now, highlight "Print Customer Labels" and select the "Add Item to Selected" button. |
| 14. | Select "By Company" from the list of actions. |
| 15. | Click the OK button. |
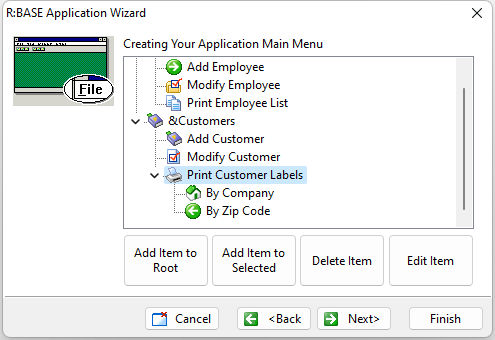
The menu "Print Customer Labels" now contains its own branch.
| 16. | Highlight "Print Customer Labels" and select the "Add Item to Selected" button. |
| 17. | Select "By Zip Code" from the list of actions. |
| 18. | Click the OK button. |
You may need to click on the plus sign (+) for the submenu to branch out for display.

The drop-down menu for the menu "Customers" is complete.