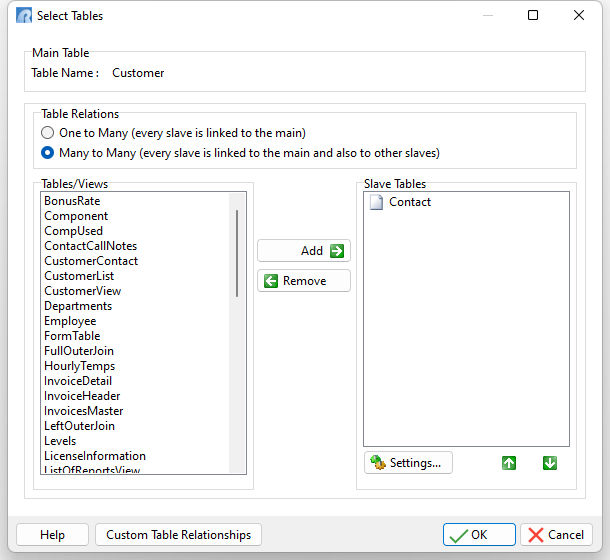
The "Add/Remove Tables" menu allows users to add and remove tables from R:BASE reports. The dialog can be viewed by selecting "Tables" > "Add/Remove Tables" from the Report Designer main menu bar.
The main table associated with the report will be listed within the "Main Table" panel. A list of defined tables for the current connected database will be listed within the "Tables/Views" panel, that can be added to or removed from the current report. Tables added to an existing report are referred to as Slave Tables. Using the green up/down arrows, slave tables should be arranged for order of processing, which is significant. An example of a many-to-many relationship with four tables is: Slave1 links to Master. Slave2 links to Master, then Slave1. Slave3 links to Master, then Slave1, then Slave2.

Table Relations
The Table Relations panel specifies the report logic, which is derived from the common data shared between the tables.
•One to Many - specifies every slave table is linked to the master table. This table relationship specifies that Table 1 can contain only one row for any given row in Table 2, but Table 2 can contain many rows for any given row in Table 1. With a two-table report, this setting is the default.
•Many to Many - specifies every slave table is linked to the master table and also to the other slave tables. With a two-table report, this table relationship specifies that Table 1 can contain many rows for any given row in Table 2, and vice versa. With more than two tables assigned to the report, this relationship can also mean that for any given row in Table 1, there are many rows in Table 2. And, for any given row in Table 3, there are many rows in Table 2. Usually, three tables are used in this relationship with two of the tables using a common column in relation to a third. These two tables do not link directly to each other; instead, each of these link to a third table in a One to Many relationship by a common key column with values that match. With more than two tables assigned to the report, this option is the appropriate setting.
Custom Table Relationships
For a "Main Table", select the Custom Table Relationships button within the Select Tables window to define custom table relationships, to set specific column links between tables. The interface provides a natural method to click and drag a column name to another column name for creating links. This is where table relationships are defined, regardless of order (in the slave tables list).
Settings
When selecting the "Settings..." button for a Slave Table, options are presented to specify custom table relationships for multi-table reports.

For a "Slave Table", click to highlight the specific table in the Slave Table list, and click the "Table Settings" button. Within the Table Settings window, notice the default table relationship is Common Field Names. Choose the "Use Links in Custom Table Relationships" option, then the "Custom Table Relationships" button. By selecting to "Use Links In Custom Table Relationships", the links in the Custom Table Relationships will be used to link with the main table and other slave tables higher in the slave list. Every slave table has its own relationship settings.