The Scrolling Region control contains other controls and can display vertical and horizontal scroll bars. Scrolling regions are useful when you want to include a fixed region on a form that will scroll to accommodate large amounts of data. For example, if you use a Contacts table, a Scrolling Region can be used to display numerous contact records from the table, and allows you to insert new rows into the table.
Scrolling Regions must be assigned to a table, and allow data to be entered into the control and saved. The height and width of the Scrolling Region control can be defined and it will scroll, as necessary, to enable the user to access all of its contents. By doing this, multiple controls can fit into a small area of a form, and the scrolling region control will not expand to take up more space than you specify.
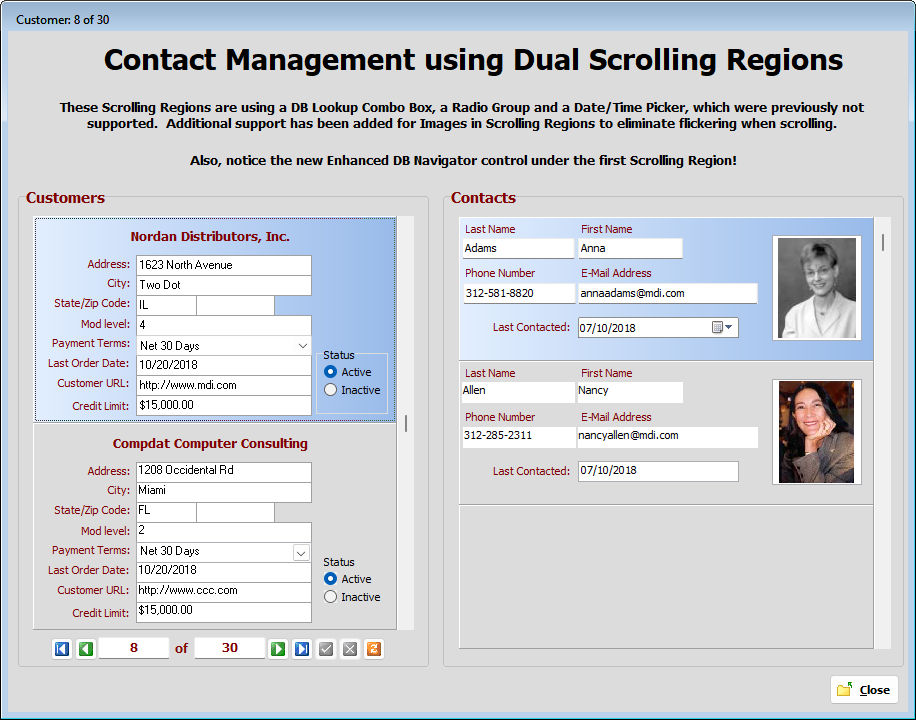
In the following image, two Scrolling Regions are used. This form is provided within the RRBYW20 sample database. Locate and run the "DualScrollRegion" form.
Add a Scrolling Region
1.In the Form Designer, select the "Scrolling Region" button on the "Database Controls" toolbar.
2.Click on the form where you want to insert the scrolling region.
3.The Scrolling Region Properties is displayed, where the table and other properties are selected.
4.Press the "OK" button to save the control on the form.
5.The size of the Scrolling Region can be adjusted by dragging the bottom right corner.
Add Controls to a Scrolling Region
1.In the Form Designer, select the control that you want from the list of controls, most likely the "DB Edit" control on the "Database Controls" toolbar.
2.Click on the top tier, or panel, of the scrolling region where you want to insert the new control. Controls will only be added to the top tier, and will be repeated in the lower tier when running the form.
3.The "Properties" dialog for the new control is displayed, where the properties are selected.
4.Press the "OK" button to save the control on the scrolling region.
Test the Scrolling Region
1.In the Form Designer, select "Form" > "Run Form" from the main menu bar. You can also press [Ctrl]+[F9].
2.This saves and runs the form from the designer for preview. This will be a read-only mode.
3.Press the [Esc] key to close the form preview.
Customize a Scrolling Region
By default, a scrolling region displays a vertical scroll bar on its right side. If there's no need to scroll, and you wish to hide the scroll bar, you can change the properties for the scrolling region.
1.In the Form Designer, right-click the Scrolling Region control, and then click "Properties" on the shortcut menu.
2.On the "Properties" tab, perform each of the following:
•To disable the vertical scroll bars completely, uncheck "Show Scroll Bar", and then the "Apply" button.
•To increase or decrease the number of records, or tiers, that will display table rows, use the arrow buttons for the "Tiers" edit field, and then the "OK" button. The height of each tier is increased/decreased in relation to the size of the Scrolling Region and the number of tiers defined. If the tier amount is decreased by one, notice the size of every tier increase to fill the space. You may to adjust the Scrolling Region height slightly to attain the ideal height and tier amount.
•Options are also available to customize the colors for the selected row and unselected rows of the scrolling region on the "Colors" tab.
Notes:
•Objects placed on the Scrolling Region object will not be able to utilize their Transparency attribute.
•When "DB Label" and "Variable Label" controls are placed within a Scrolling Region with the "Autosize" option selected, the length of all of the "DB Label" and "Variable Label" controls will be auto-sized to the *selected* region row. It is suggested that you expand the length and remove the "Autosize" option for all Variable Label controls located within the Scrolling Region.
•When editing child controls contained within a Scrolling Region, multiple objects may be selected by using the [Ctrl] key while dragging the mouse cursor. The [Ctrl]+Drag process must be started when the mouse is on top of a child control.
Unsupported Controls for Scrolling Regions
The following form controls are not supported to be placed in a Scrolling Region:
Standard Controls
•Enhanced Panel
•Enhanced Group Box
•Wallpaper
•Custom Wallpaper
Additional Controls
•Office Button
•Drop-Down Menu Button
•AVI Animate
•Splitter
•Tab Control
•LED Text Label
•Analog Clock
•Digital Label
•Tree View
•List View
•Shape Button
•Meter
•Group Bar
•Enhanced Tab Control
•Enhanced Speed Button
•PDF Viewer
•Tab Set
•Time Picker
•Enhanced Calendar
•Collapse Panel
Database Controls
•DB Grid
•DB Navigator
•DB Rich Edit
•DB Calendar
•DB Web Browser
•DB Lookup List Box
•DB User Defined Combo Box
•DB User Defined List Box
•Scrolling Region
•Enhanced DB Navigator
•Enhanced DB Grid
•Enhanced DB Rich Edit
•DB Time Picker
•Enhanced DB Calendar
Variable Controls:
•Variable Rich Edit
•Variable Calendar
•Variable Web Browser
•Variable Lookup List Box
•Variable User Defined Combo Box
•Variable User Defined List Box
•Variable Time Picker
•Enhanced Variable Calendar
Internet Controls:
•Web Browser
File System Controls:
•Directory Tree
•File List Box
Legacy Controls:
•Panel
•Group Box