The structure of a database includes table and column names, and column characteristics such as data type, length, and index status. As you develop a new database, it's quite common to modify the database structure. For example, add a computed column to automate a calculation you frequently perform, or define rules that make sure only valid information can be entered into the tables.
Modifying a Table
Columns can be added or modified anywhere in a table. The table might or might not contain data. In this section, you will modify the Flights table by adding a new column that calculates the total cost of the advertising slogan for each flight.
The number of letters in the advertising slogan determines the skywriting fee. The price per letter is contained in the Price column of the Flights table. In order to see the total cost of the slogan for a flight, the number of letters in the Letters column needs to be multiplied by the rate in the Price column. You can have R:BASE calculate the total cost of a slogan by defining a computed column.
To open the Flights table for modification:
| 1. | If the Database Explorer is not open, choose Tools: Database Explorer... |
| 2. | Click the Databases option. |
| 3. | Highlight "SkyWrite." |
| 4. | Click the "Connect Database" option to open the SkyWrite database. |
If you were not already connected to the database, you will see the options for tables, views, forms, reports, labels, and stored procedures appear.
| 5. | Click the "Tables" option for the table list to appear. |
| 6. | Highlight "Flights" from the table list and enter the Data Designer. You can enter the Data Designer by selecting "Design Table" from the "Group Bar" or by right clicking on the table name and selecting "Design Table". |
| 7. | Click the "Columns" option. |
R:BASE displays the columns in the Flights table.
About Computed Columns
A computed column uses an expression or function to calculate a value from the values of other columns in a table or from constant values you specify. An expression is a calculation used to determine a value and is made up of operators and operands. The operators are listed below:
Operator |
Definition |
+ |
Addition |
- |
Subtraction |
* |
Multiplication |
/ |
Division |
** |
Exponentiation |
+ |
Concatenation (with no space) |
& |
Concatenation (with one space) |
Operands, which are the part of the expression the operators are acting on, can be variables, constant values, or column names.
Like a regular column, a computed column has a data type and can be indexed. Unlike a regular column, a column that does not contain a value until you enter one, you can't enter or update a value in a computed column. R:BASE enters or updates the value for you.
To calculate the total charge for a slogan, you'll define this expression:
operator
|
Letters * Price
\ /
operands
Note: For more information about expressions, see the "Expressions" chapter within the "Reference Index" of the R:BASE Help.
Adding a Computed Column
You can change any part of the column definitions for a table. For this lesson, you won't change any of the existing columns; you'll just add a new column. When using computed columns, it is important that a computed column always follow any columns used in its expression.
The first column in the table, CustomerID, is highlighted. Columns are inserted above the highlighted column, so you need to first scroll the column list display past the Letters and Price columns.
To add a computed column to the Flights table:
| 1. | In the "Data Designer" window under the "Columns" tab, click in the Place column. |
| 2. | Click the "Insert Column" option. |
R:BASE displays a dialog box for the new column name.
| 3. | Name the column "TotalCharge". You will notice the column was inserted above Place. |
| 4. | Choose "CURRENCY" from "Data Type". |
| 5. | Check the "Compute" radio button. |
R:BASE will change the screen for you to enter an expression.
| 6. | Enter "(Letters * Price)" in "Expression". |
| 7. | Enter "Total charge for slogan" in "Description". |
The computed column TotalCharge has now been added to the Flights table.
| 8. | Click the "Save" option. |
| 9. | After confirming that the changes were saved, select the "Close" option. |
Data Entry Rules
Data entry rules help ensure that the information in your database is accurate and reliable. You can use rules to ensure that the data entered into a column meets the criteria you specify.
There are two methods for defining rules. You can create quick rules-rules with conditions and messages supplied by R:BASE-or define custom rules. When you define custom rules, you must define all parts of the rule. In this lesson, you'll use a quick rule option to create two rules for the Flights table that say:
•The Price column must contain a value between $40 and $75.
•The TotalCharge column must be greater than or equal to $400.
These rules ensure that the prices charged for slogans meet expenses. Thus, at the price of $40 per letter, a customer displays a slogan of up to 10 letters in order to meet the minimum total charge requirement of $400.
Defining a Quick Rule
The easiest way to define a rule is to use one of R:BASE's quick rule options.
To define a Quick rule:
| 1. | Enter the "Data Designer" window for the Flights table. |
| 2. | Click the "Rules" option. |
R:BASE displays rules that have been defined for the selected table, Flights. No rules have been defined yet so the screen is empty.
| 3. | Click the "Add Rule" option. |
R:BASE displays the "New Rule" dialog box.
| 4. | Click the arrow on the "Rule Type" drop down menu to display the rule types. The first seven rule types define quick rules. The last allows you to define a custom rule. |
| 5. | Select "Specify a value range". |
R:BASE will display a drop down box to select the Rule Column-the column this rule will apply to.
| 6. | From "Rule Column" select "Price". |
| 7. | Enter "$50", the maximum value for the range, in "Maximum Value". |
| 8. | Enter "$40," the minimum value for the range, in "Minimum Value". |
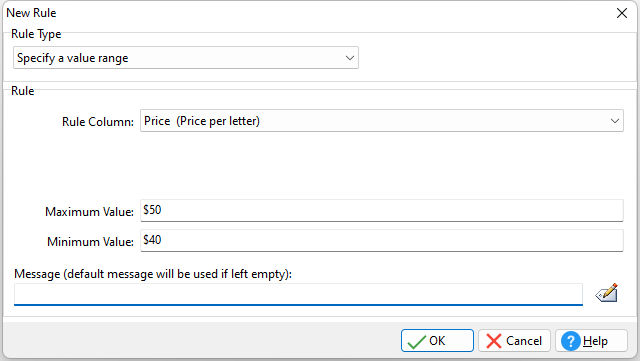
For the "Message" field, note the button to the far right, and hover the mouse cursor over it. The hint reveals a default message will be composed.
| 9. | Click the button. |
The message "Value for Price cannot be outside the allowed range." appears.
| 10. | Click the OK button. |
R:BASE returns to the "Data Designer" window and lists rules defined for the Flights table.
| 11. | Click the "Save" option. |
| 12. | After confirming that the changes were saved, select the "Close" option. |
R:BASE saves the table and the rule definition.
Listing Rules
When you define a quick rule, you choose only the rule table and column. R:BASE supplies the rest of the rule definition for you. When listing rules, you see all parts of the rule definition.
To list rules for the Flights table:
In the "Data Designer" window, click the Rules button. R:BASE displays the rule you just defined.
Rules are displayed for the selected table only. You can view all the rules defined for a database, by using the LIST command at the "R> Prompt" window.
To list rules for all the tables:
| 1. | Choose Tools: R> Prompt... |
The "R> Prompt" window opens.
| 2. | Enter "LIST RULES" at the "R>" prompt and press [Enter]. |
A list of all rules defined for the database is displayed.
Parts of a Rule
Whether you define quick rules or custom rules, all rules have four parts:
•Rule Table-The table to which a rule applies.
•WHERE clause-The WHERE clause specifies the exact conditions a row must satisfy or not satisfy (depending on whether you choose Succeeds or Fails) in order to be added to the table.
•Succeeds/Fails-A row must meet or must not meet the conditions specified in the WHERE clause. Succeeds specifies that a row is added to the table only if it satisfies the conditions in the WHERE clause. Fails specifies that a row is added only if it does not satisfy the conditions in the WHERE clause.
•Rule message-The rule message is what you want displayed if the conditions of the rule are violated.
You can change any or all of these parts of a rule.
For the rule you just defined, R:BASE used a standard message: "Value for price cannot be outside allowed range." This message is easy for you to understand because you designed the database and created the rule. But other users entering data probably won't know the allowed range, so you should change this message to say what the allowed range is.
Modifying a Rule
Once you have created a rule, you can edit the rule to change the message, the rule condition, or any other part of the rule.
To change the rule message:
| 1. | In the "Data Designer" window for the "Flights" table, click the "Rules" tab. |
R:BASE displays the rules defined for the Flights table.
| 2. | Select the rule you just defined |
| 3. | Click the "Modify Existing Rule..." option. |
R:BASE displays the "Rule" dialog box. You can change any part of the rule definition here. Let's change the message and maximum range value.
| 4. | Select $50 value and change it to $75. |
| 5. | Highlight the rule message in "Message". |
| 6. | Edit the text to "Price per letter must be between $40 and $75." With the radio button on " Add/Modify" the message will be updated. |
| 7. | Click the OK button. |
R:BASE writes the change to the rule.
| 8. | Click the "Save" option. |
Creating a Rule on Your Own
Following the steps used previously, create a rule that says the total charge for a flight must be at least $400.00 before it can be entered in the Flights table. After you create the rule, change the rule message.
Here's the information you'll need to create the rule and modify its message:
•The rule table is Flights
•The quick rule option is "Specify a minimum value"
•The rule column is TotalCharge
•The minimum value is $400.00
•The modified rule message is "Flights cannot be ordered for less than $400.00"
After you are done with the modifications to the SkyWrite database and have saved your changes, close the "Data Designer" window.
To close the "Data Designer" window:
| 7. | Click the "Save" option. |
| 8. | After confirming that the changes were saved, select the "Close" option. |