R:BASE stores data in tables. Each table holds data for one particular subject. Before you begin entering the data you want stored, you define the database by naming it. You then name a table and define its columns. One by one, you continue naming tables and defining columns until you have defined the complete database.
The following sections show you how to define the SkyWrite database with its three tables and their columns.
To build a database:
| 1. | From the Database Explorer, choose the "Databases" option in the Group Bar and select "New Database". |
R:BASE displays the "New Database" dialog box. When you create a database, the first task is to name it. Database names can be up to 128 characters long.
| 2. | Enter "SkyWrite" in the "Database Name" field. At this point you can also specify the Owner user name for the database to control user access to the database. For this sample, leave the Owner name option unchecked. |
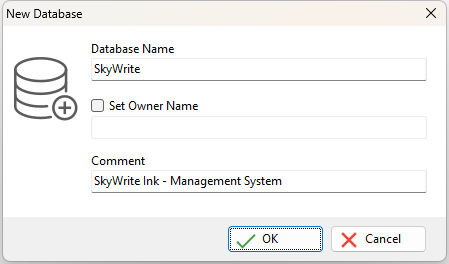
| 3. | Enter "SkyWrite Ink - Management System" in the "Comment" field. The comment allows for a description to be specified for a database. |
| 4. | Click the OK button. |
R:BASE displays the "Data Designer" window and you will be prompted for a table name.
Defining Tables
Next, we'll define the three tables that are in the SkyWrite database. The actual number of tables and columns that can be defined in a database may vary based on the amount of available memory. When a database is created, R:BASE automatically creates some tables and columns to hold system information called System Tables.
The Employee Table
The first table we'll define is the Employee table, the table we designed to hold the data for employees. When defining a table, fill in the table name and description, and then define the columns that belong in the table.
To define the Employee table:
| 1. | If this is the first table in a new database, the Data Designer will launch automatically for a new table name. Otherwise, from the Database Explorer, you would choose "Tables" and "New". |
| 2. | Enter "Employee" in "Table Name:". A table name can be as many as 128 characters long. |
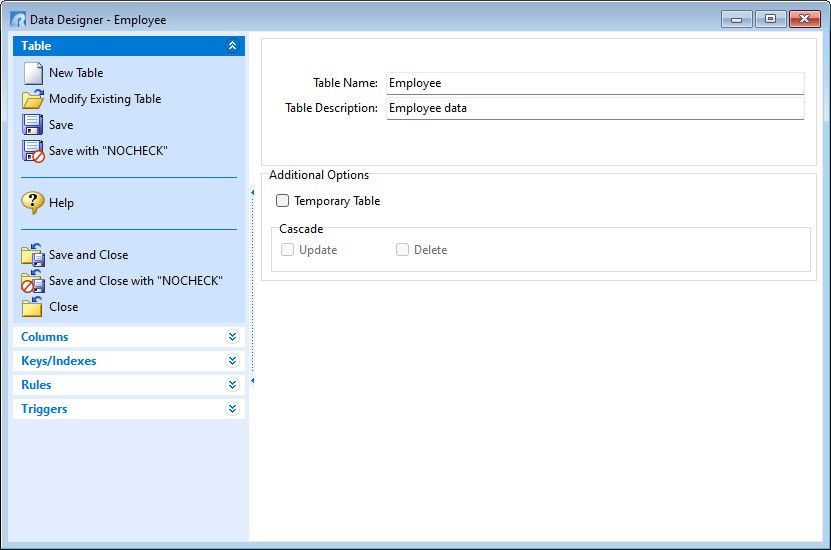
| 3. | Enter "Employee data" in "Table Description." |
| 4. | Click the "Columns" option. |
Here you enter the name, data type, description, and other column attributes. You first name the column.
| 5. | When adding a column to a table for the first time, the "Enter New Column Name" dialog will appear. Otherwise, for an existing table, you would select the "Add Column" button. When creating a column, the table name is pre-defined as a template. The "table-name" template allows columns to be defined with the table in mind. In the "Data Designer" window, define the columns for the table: |
•For the first column, use "EmployeeID". With Employee already listed in the dialog, simple add "ID" at the end.
•Select a data type for the column. We determined the data type for the EmployeeID column in Lesson One. Since the column contains whole numbers only (no fractions or decimal values), we decided on an INTEGER data type for the column. Select "INTEGER". By pressing the [Enter] key while the data type column is highlighted or double-clicking on the data type option will allow a drop down box to appear.
•Select "AutoNum". When a column is auto-numbered, R:BASE will assign a new, higher number to the column for each row that is added to the table. R:BASE allows you to assign the first number in the auto-numbering sequence and to set the amount by which the number will increase.
•Enter "107" in "Initial Value". At the end of this lesson, the steps will load the database tables with data. Because there are already seven employees whose ID numbers run from 100 through 106, we want the next employee added to the table to have the Employee ID 107 in the EmployeeID column.
•Leave "Increment Value" as 1. Each new row added to the table will have a number that is one higher than the previous number.
•In "Description", enter "Employee identification number" as the description for the EmployeeID column.
This completes the definition of the first column in the table.
| 6. | Select the "Add Column" option and add "FirstName" to the end of "Employee" to create "EmployeeFirstName" in the next row as the name of the second column. |
•Select "TEXT" in the "Data Type" column.
•Enter 25 to set the column length. For TEXT data types, R:BASE asks you to define the length of the column. The default length for the TEXT data type is 8 characters. However, an employee's first name might be longer than this, so we'll allow as many as 25 characters to be entered into the column. Press the [Enter] key to edit the 8 to 25. The press [Enter] again to save the change.
•Enter "Employee first name" in "Description".
Now define the remaining eight columns for the Employee table. The information you need to define them is shown below. Column descriptions and default values are optional in R:BASE. If you don't want to include them, leave "Description" and/or "Default" blank.
Note: The Data Designer interface is set up to allow the insertion of multiple columns while defining the column name, data type and, if applies, the length. Using the [Tab] key, you can move left to right and top to bottom adding new columns. After leaving the length field using [Tab], R:BASE will prompt you for a new column name. The values for default value and description can be added after all the column values are stored.
Column Name |
Data Type |
Length |
Default |
Column Description |
EmployeeLastName |
TEXT |
25 |
Employee last name |
|
EmployeeAddress |
TEXT |
40 |
Employee address |
|
EmployeeCity |
TEXT |
25 |
Employee city |
|
EmployeeState |
TEXT |
2 |
WA |
Employee state |
EmployeeZip |
TEXT |
10 |
Employee zip code |
|
EmployeeAreaCode |
TEXT |
3 |
Employee area code |
|
EmployeePhone |
TEXT |
8 |
Employee phone number |
Based on your screen's resolution settings, R:BASE will display around 20 column definitions at a time. A scroll bar is displayed on the right side when more columns are defined than fit on the screen. You can also use the arrow keys to move the cursor within the "Column Name", "Data Type", and "Length" column lists. In the column lists, another column can be added or a defined column can be modified. Use the mouse to select a column under "Column Name" to view or modify previously defined columns. To delete the selected column, click the "Delete Column" button. To insert a column, click the "Insert Column" button. R:BASE inserts the new column above the highlighted column.
| 7. | Click the "Save" button to store the Employee table in the database. |
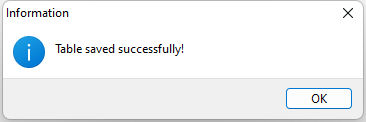
R:BASE displays a message confirming that the table was saved successfully.
| 8. | Click the "Close" option to close the Data Designer. |
You have finished defining the first table in the SkyWrite database.
The Customer Table
Next, we'll define the Customer table, the table we designed to hold data for customers. We follow the same process as for the Employee table.
To define the Customer table:
| 1. | From the Database Explorer, choose "Tables", and select "New". |
| 2. | Enter "Customer" in "Table Name." |
| 3. | Enter "Customer data" as the table description. |
| 4. | Click the Columns button. |
You are ready to define the columns in the Customer table. Define the columns just as you did when you defined the columns for the Employee table.
| 5. | Enter "CustomerID" in the first row under "Column Name" to start defining columns. |
CustomerID is also an autonumbered INTEGER column. Define it using the same procedure as in Step 5 in the previous procedure for EmployeeID in the Employee table. For CustomerID, make the initial value 16. The increment is 1.
| 6. | Enter a description, "Customer identification number". |
| 7. | Define the rest of the columns in this table. |
Column name |
Data type |
Length |
Default |
Description |
CustomerFirstName |
TEXT |
25 |
Customer first name |
|
CustomerLastName |
TEXT |
25 |
Customer last name |
|
CustomerCompany |
TEXT |
30 |
Customer company |
|
CustomerAddress1 |
TEXT |
40 |
Customer first address |
|
CustomerAddress2 |
TEXT |
40 |
Customer second address |
|
CustomerCity |
TEXT |
25 |
Customer city |
|
CustomerState |
TEXT |
2 |
WA |
Customer state |
CustomerZip |
TEXT |
10 |
Customer zip code |
|
CustomerAreaCode |
TEXT |
3 |
206 |
Customer area code |
CustomerPhone |
TEXT |
8 |
Customer phone number |
| 8. | Once you have defined all the columns in customer, click the the "Save" option. |
| 9. | Then, confirm that the changes were saved, and select the "Close" option. |
You've finished defining the second table in the SkyWrite database. Now we'll define the Flights table.
The Flights Table
The last table we'll define for SkyWrite contains information on the flights made by SkyWrite Ink. The table is linked to the two tables we've already created by including the columns EmployeeID and CustomerID.
To define the Flights table:
| 1. | From the Database Explorer, choose "Tables", and select "New". |
| 2. | Enter "Flights" in "Table Name." |
| 3. | Enter "Flight data" as the table description. |
| 4. | Click the Columns option. |
You are ready to define the columns in the Flights table. Define the columns just as you did when you defined the Employee and Customer tables.
| 5. | Enter "FlightID" in the first row under "Column Name" to start defining columns. |
FlightID is also an autonumbered INTEGER column. Define it using the same procedure as in Step 5 for the EmployeeID column in the Employee table. For FlightID, make the initial value 30. The increment is 1. Enter "Flight identification number" as the description.
| 6. | Enter "CustomerID" in the second row under "Column Name" and press [Enter]. |
R:BASE displays the INTEGER data type for the column. R:BASE knows that the column already exists in the Customer table, and automatically supplies the correct data type. This is part of R:BASE's relational capability; columns cannot have the same name and different data types. The description will also automatically populate.
| 7. | You may keep the populated value, or enter "Customer booking flight" for the "Description." |
| 8. | Now, define the rest of the columns that make up the table just as you did when you defined columns for the previous two tables. |
Column name |
Data |
Length |
Default |
Compute |
Column Description |
EmployeeID |
INTEGER |
N/A |
Employee selling the flight |
||
FlightDate |
DATE |
N/A |
Date of the flight |
||
Slogan |
TEXT |
30 |
Slogan to be written |
||
Letters |
INTEGER |
N/A |
Number of letters in slogan |
||
Price |
CURRENCY |
N/A |
Price per letter |
||
Place |
NOTE |
N/A |
Where to write slogan |
The Place column has a NOTE data type. NOTE columns allow you to enter information whose length can be quite long, up to 4,096 characters. We've made Place a NOTE column so that the employee who booked the flight has plenty of room to enter special instructions or other important information concerning the flight.
| 9. | Once you have defined all of the columns in the Flights table, click the the "Save" option. |
| 10. | Then, confirm that the changes were saved, and select the "Close" option |
You've finished defining all the tables in the SkyWrite database.
Viewing Database Information
You now have a database named SkyWrite with three tables: Employee, Customer, and Flights. The database contains 28 columns. When you are working with your database, you can view information in the tables and columns in the database at any time using the Data Dictionary.
To look at information in the SkyWrite database:
| 1. | From any area of R:BASE, press [F3], or from the menu bar select "Tools" > "Data Dictionary". |
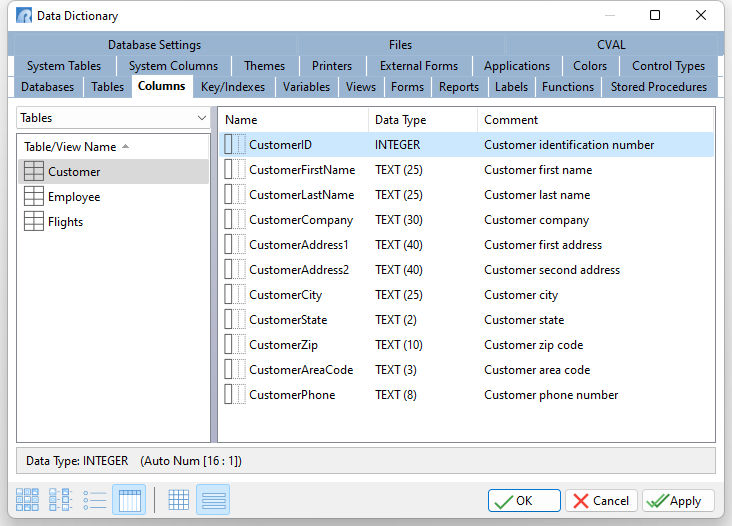
R:BASE displays the "Data Dictionary" dialog box. Use the dialog box to show information about your database. The tabs across the top lists the types of database information you can display. When the "Tables" tab is selected and shows three tables in the middle box. The tables are listed in alphabetical order. The display in the Data Dictionary can be changed on your preferences using the four buttons on the bottom left corner. Choose the fourth button on the right.
| 2. | Select "Customer". |
The table description is displayed in the right panel of the dialog box.
Using the Data Dictionary, you can also see the names of the columns that are in each table.
| 3. | Select "Columns" tab and select the specific table. |
The Customer table is automatically highlighted and R:BASE displays a list of the columns in that table and column the description. The columns are displayed in the order they were created.
| 4. | Select "CustomerLastName". |
The data type and column length are all displayed when you select a column name.
| 5. | Click the Cancel button to return to the "Database Explorer" window. |