The first step in the "Query Builder" window is to select the tables to include in the query. Each table you select is displayed in the "Tables/Views in Use" panel. Remember, this is the same window you used to create a condition for your query earlier in Lesson 3.
To select the tables for the view:
| 1. | In the "Query Builder" window, select "Customer" from "List of Tables/Views" |
| 2. | Click the "Add Table/View" button. |
R:BASE displays "Customer T1" in the "Table/Views In Use" panel. The syntax "FROM Customer T1" is also added to the SELECT syntax panel. "T1" is the alias name R:BASE assigned to the Customer table. The number on your table alias may not match to the "T1" in this example.
Next, we'll add the second table to the query.
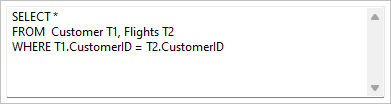
| 3. | Select "Flights" in "List of Tables/Views" and click the "Add Table/View" button. |
R:BASE displays "Flights T2" in a second box in the workspace. R:BASE adds "Flights T2" to the FROM part of the query. "T2" is the alias name R:BASE assigned to the Flights table. The WHERE part of the query has also changed to display the link between the tables. The number on your table alias may not match to the "T2" in this example.