A query is a question to the database that you construct, allowing you to specify the information you want to see. When we opened the Flights table and displayed the data in the "Data Browser" window, we actually made a query. We told R:BASE to display all the data in all of the columns in the Flights table. You can look at your data any way you want with a query. Creating a new query is very simple in R:BASE using the Query Wizard, which displays a graphical representation of your query.
Before working on the query, we'll close the "Data Browser" window and open the "Query Wizard" window. Close the Data Browser.
To build a query with the Query Wizard:
| 1. | If the SkyWrite database is not open, click the Databases tab in the Database Explorer and select "SkyWrite". |
| 2. | Click the Connect option. |
| 3. | To open the Query Wizard, select Views from the Group Bar followed by "New View...". |
A pop up will appear asking if you would like to use the Query Wizard.
| 4. | Select Yes. |
The "Query Wizard" window is displayed.
| 5. | To start, select "Tables" from the "List of Tables/Views" to the right. |
The list of defined tables for the database will appear. To add a table to your query, select a table from the "List of Tables/Views" to the right, and drag the table onto the workspace by holding down your left mouse button. Wherever you let go of the mouse button, the table with the column list will appear.
| 6. | Drag the Flights and Customer tables into the workspace. |
To select your columns, either right click in the table area and use the context menu to "Select All" or "Unselect All" columns, or click the check box next to the column name to select individual columns.
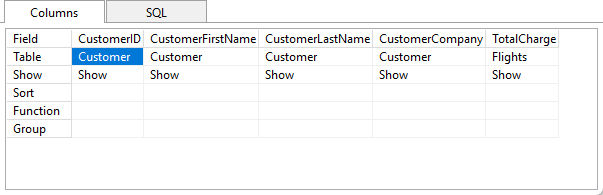
| 7. | Select the CustomerID, CustomerFirstName, CustomerLastName, and CustomerCompany columns for the Customer table. |
| 8. | Select the TotalCharge column from the Flights table. |
Notice that when each column is selected, the column grid below id being populated with your selections. What you are basically doing is constructing a SELECT clause that your query is based upon. Next, you will add a WHERE Clause to limit the amount of data returned.
To add a WHERE clause to your query, you need to drag the linking column from one table to the linking column in the other table. The direction that you drag the link is relative to create the WHERE clause syntax. In the example below, if CustomerID from "Customer : T2" is dragged to "Flights : T3", the WHERE clause would look like: WHERE t2.CustomerID=t3.CustomerID. However, if CustomerID from "Flights : T3" is dragged to "Customer : T2", the WHERE clause would look like: WHERE t3.CustomerID=t2.CustomerID. This may be relevant in some cases when the selected columns will limit the results from either table.
Note: When using tables with many columns and a desired field is located at the bottom of the column list, a field may be dragged to the table name (the header), where a dialog will be displayed to select the field from the list. If a common field name match is found, it is selected by default. A filter box is also available to narrow the field list.
| 9. | For this view drag the mouse from "Customer : T2" CustomerID to the "Flights : T3" CustomerID. |
The link, in the form of a line from column to column, will appear in the workspace joining the tables.
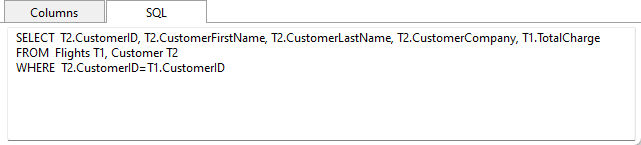
As you edit the query, the "SQL" syntax for the SELECT command in the bottom panel will change. Select the "SQL" tab to see the syntax. To refresh the changes, select the "Build SQL" button on the toolbar. It should read as follows:
The Query Wizard also gives you the option of sorting the data in an ascending or descending order. This will add an ORDER BY clause at the end of the WHERE clause.
To sort your query with an ORDER BY clause:
| 1. | Click the "Columns" tab in the lower panel of the Query Wizard to display the selected columns. |
| 2. | Right click the "Sort" row of the column CustomerID. |
| 3. | From the speed-menu list, choose "Ascending". |
The text "ASC" should appear in the column.
The Query Wizard also gives you the option of adding an aggregate function to the query. An aggregate function calculates the sum, count, minimum, maximum, or average for a selected column.
To add an aggregate function to a column in your query:
| 1. | Click the "Columns" tab in the lower pane of the Query Wizard. |
| 2. | Right click the "Function" row of the column TotalCharge. |
| 3. | From speed-menu list, choose "Sum". |
The text "SUM" should appear in the column.
The Query Wizard gives you the ability to Group columns so that only distinct values for a column appear.
To Group a column or columns in your query:
| 1. | Click the "Columns" tab in the lower pane of the Query Wizard. |
| 2. | Right click the "Group" row of the column CustomerID. |
| 3. | Choose "Group" from the speed-menu. |
| 4. | Repeat this step for the CustomerFirstName, CustomerLastName, and CustomerCompany columns. |
The text "Group" should appear in the columns.
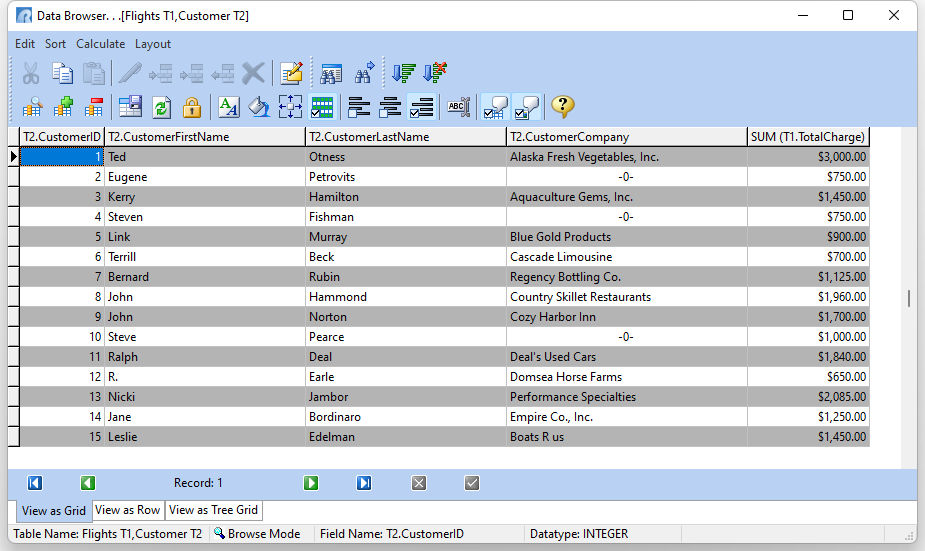
The query that is geared to display customers grouped together with the sum of their total charges. To preview your query click the "Browse Query" button from the toolbar.
Your query will then be displayed in the Data Browser window. You may have to drag the window wider or drag the column lengths shorter to fit in the screen, but it should look like the picture below.
Close the Data Browser to return to the Query Wizard.
You can print the data to the printer by choosing any of the "Output Data" options.
To view the complete SQL statement for the new query, select the "Build SQL" button on the toolbar.
You can save the query as a view to review at a later time.
To save the query as a view:
| 1. | Choose the "Save Query" button from the toolbar. |
The "Save Query as" dialog will appear.
| 2. | For the "View Name:" field, enter "CustomerTotals". |
| 3. | Enter "Customer Totals" in the "Comment" field. |
| 4. | Close the Query Wizard using the "Close" option. |
The view will appear in the Database Explorer under Views.